TP-Link VR600 Installation Guide
TP-Link Archer VR600 Box content
The TP-Link VR600 box should contain:
- A modem, with 3 antennas
- A PSU (Power Adapter) with the correct socket
- 1 x RJ11 <-> wall socket cable, to connect the modem to the DSL port
- An RJ45 Ethernet cable, suitable for GigabitEthernet connections
TP-Link VR600 Physical installation
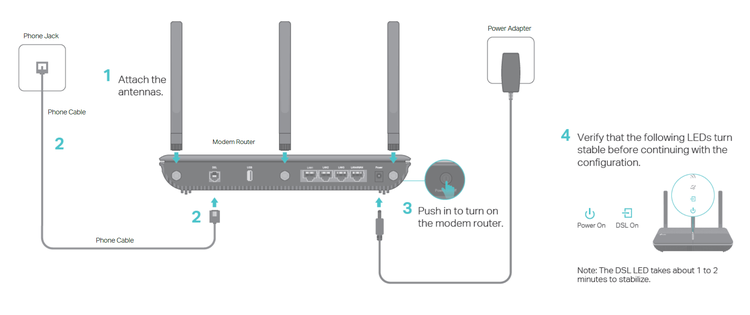
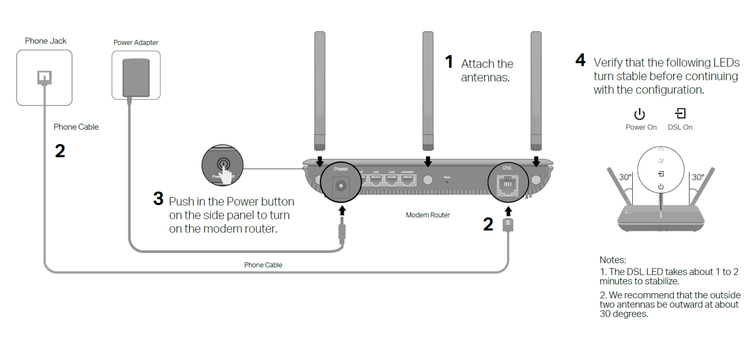
- Connect the TP-Link VR600 modem router VDSL2 WAN port to a wall socket (2), use provided country kit adapter, if necessary
- Connect your computer to the TP-Link VR600 modem router’s LAN port via a provided Ethernet cable
- Plug the power adapter to the power outlet and connect other end of the cable to the Power port of the TP-Link VR600 modem router
- Power on your TP-Link VR600 modem router (3)
- Configure your network with the Technical details provided in Order Completion e-mail
- Start your computer. You should be able to browse the Internet instantly
Notes:
- The antennas are optional. In many installations wireless is disabled what is removing the need for the antennas.
- The splitter installation is optional. The Phone cable can be directly inserted into the modem from the wall socket (2). If you need phone service install the DSL splitter.
- Wait 1-2 minutes for the Power and DSL LED to be On and Stable.
TP-Link VR600 V2
TP-Link VR600 V3
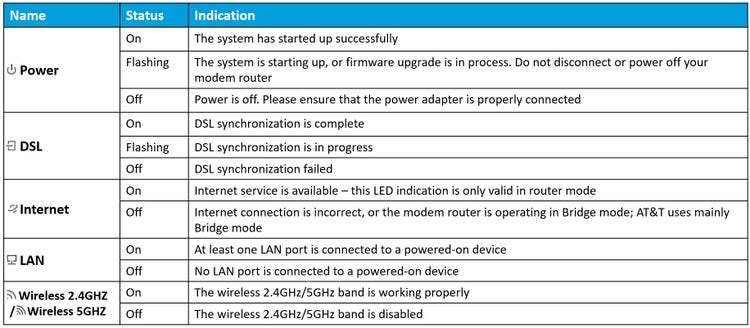
LED indications
On top of the TP-Link VR600 modem router, there are 7 LEDs. In the Bridge mode it is normal that the Internet LED is off.
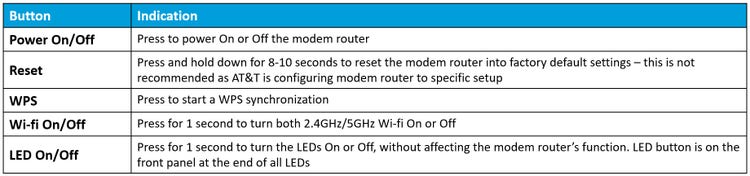
Button Legend
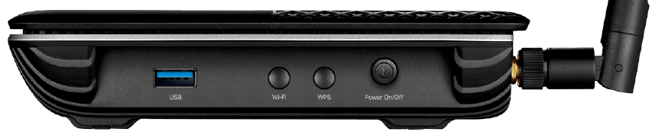
The modem router’s side panel and top panel show buttons. Refer to the below table for legend.
TP-Link VR600 V2

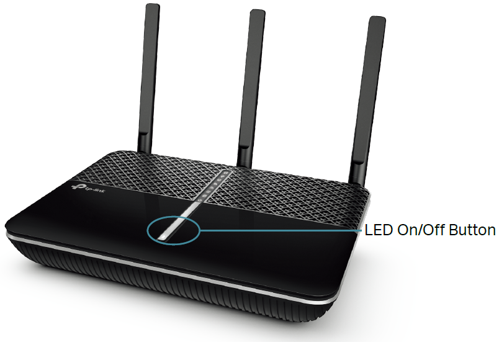
TP-Link VR600 V3
Related content
- Get Prisma VPN Tunnel setup requirements
- TP-Link VR300 Installation Guide
- SmartRG SR506N Installation Guide
- How to Make Changes to AT&T Virtual Private Network Port Speeds
- How to Make Changes to AVPN Port Level Class of Service
- Customer expectation document for AT&T Virtual Private Network
- International contact list: AT&T Virtual Private Network
- How to run VoIP reports using Access Network performance Reporter in AT&T Business Center
- Learn about AT&T Virtual Private Network Service Orders
- AT&T VPN Service Customer Not Ready Policy
- AT&T VPN Delivery and Installation: LAN Migration and Post Install Support
- AT&T VPN Delivery and Installation: Day of Installation
- AT&T VPN Delivery and Installation: Prepare for Installation
- AT&T VPN Delivery and Installation: Access Delivery
- AT&T VPN Delivery and Installation: Equipment Delivery
- AT&T VPN Delivery and Installation: Welcome